
If this is your first time creating a resume in Microsoft Word, the process may seem overwhelming. Luckily, this article is here to help! In this step-by-step guide, we will cover how to create an effective resume from start to finish using Microsoft Word.
Written by Ed Moss • Last updated on Apr 30, 2024There are two primary methods for making a resume in Microsoft Word:
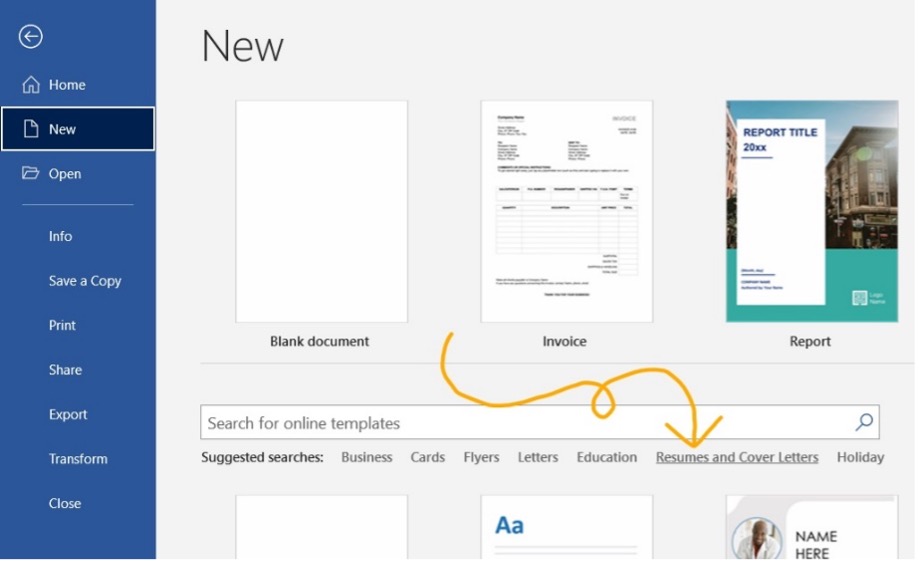
To use a template, go to File > New and then select a template from the Resume and Cover Letter section.
The format you choose will depend on your experience level!
There are 3 basic resume formats to choose between:
Choosing the best format for your needs is key. For more help on this subject, check out our guide on How to Choose the Correct Resume Format in 2024!


First, let’s make sure you can navigate the Microsoft Word ribbon!
The ribbon is the toolbar found at the top of the screen.
It should look something like this:

The main parts of the ribbon you should familiarize yourself with on the Home tab are Font, Paragraph, and Styles.
These are how you will edit the appearance of your text and headers.
You should also familiarize yourself with the Layout tab.
This tab is where you will adjust your margins and add columns!
Once you have taken your time to figure out where all of your tools are, it’s time to begin building your resume!
Important Note: These steps detail how to create a resume in Microsoft Word from scratch. By using one of the program’s pre-made templates, you can bypass many of these steps and simply fill in the pre-made format.
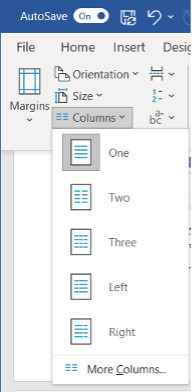
Let’s begin by visiting the Layout tab.
Here, you can set your margin size and decide if you want to use columns.
Here is a breakdown of these two elements:
We recommend using 1-inch margins on all sides.
This will give you enough white space to keep your resume looking neat without sacrificing too much space.
It will also ensure your formatting looks good on printed versions of your resume.
From the columns tab, you will find five options:
From the Home tab, you can edit the following elements of your layout:
Choose between left, center, or right alignment.
We recommend using the left alignment.
Whichever you choose, it is a good idea to keep your alignment consistent across the board.
We recommend using 1.15 – 1.5 line spacing for the body text.
For section titles and headers, use 1.5 – 2.0 spacing to help them stand out from the rest of the text.
Use a simple and highly legible font. Try to use only 1-2 fonts throughout your resume.
We recommend the following seven fonts:
Your title header should contain the following information:
Use an H1 header to write your name at the very top.
Use the Normal style to write the rest of your information (see “How Do I Add Different Sections of the Resume on Microsoft Word” below for more information on header styles).
It should come out looking similar to this:
Copywriter
Email: janesmith@website.com
Phone: (123) 456-7890
Website: Janesmith.com
LinkedIn: linkedin.com/in/janesmith
Check out some of our free resume examples to see alternative ways of formatting your title header!
Following your title header will be your resume objective or summary.
This will be a short statement between 1-5 sentences detailing your desired job title, experience, and career goals.
You will want to write this statement in the Normal style.
However, you may want to use a slightly larger font than the rest of the text in other sections.
This will help your objective or summary statement to stand out.
Here is an example of how this might look with the title header example from before:
Copywriter
Email: janesmith@website.com
Phone: (123) 456-7890
Website: Janesmith.com
LinkedIn: linkedin.com/in/janesmith

By creating a base format, you can save the document as a separate file to return to and fill in again and again.
This will help you to tailor your resume to fit specific jobs!
The idea of the base format is to provide outlined sections with the correct spacing and number of bullet points.
You are essentially creating a skeleton for your resume that you can edit and adjust over time.
By doing so, you ensure you have already allocated the proper amount of space on the resume for each section.
For example, this is what your base Work Experience section may look like:
Job Title 1, Company Name
Date – Date
· Descriptive Sentence
· Descriptive Sentence
· Descriptive Sentence
Job Title 2, Company Name
Date – Date
· Descriptive Sentence
· Descriptive Sentence
· Descriptive Sentence
Job Title 3, Company Name
Date – Date
· Descriptive Sentence
· Descriptive Sentence
· Descriptive Sentence
As you gain more work experience, you can return to this base format and make changes as need be.
Because you have already outlined the section, you won’t have to worry about reformatting the entire resume to make a few simple changes.
Once you have built the base format of your resume, it’s time to determine if your sections are in the optimal location.
For instance, if you are creating a Reverse-Chronological style resume you will want your Work Experience section to come first.
Comparatively, if you are creating a Functional style resume you may want your Skills or Education section to come first.
The order and organization of your sections will impact the impression your resume makes on hiring managers.
Now that you have created the base format of your resume and chosen the optimal organization, it’s time to fill in your information!
When filling in your information, be mindful of the following 3 factors:
Not sure how to make your language more compelling on your resume? Take a look at our list of 350+ Action Verbs to Make Your Resume More Effective in 2024.

Once you have completed steps 1-6, look back over your resume and make sure you have included all of the key sections.
You should also take some time to consider what additional sections you could include.
Here are the key sections every resume should have:
As we have covered, the order of these sections will vary depending on the format you have chosen.
However, each of these sections should always be included in your resume.
There are also some additional sections to consider adding.
Here is a quick list of extra sections that can add some extra flair to your resume:
The way to create different sections on your resume comes in two parts:
Here is a breakdown of how to use the H1, H2, H3, and Normal styles within your resume:
Select the Styles window from the Home tab.
From here, you will have options to create headers.
Your heading options are as follows:

Microsoft Word is a handy tool to have, especially if your computer comes with the program pre-installed.
Here are 3 pros and 3 cons to using Microsoft Word to create your resume:
By using a resume template from an online provider, such as Easy Resume, you are more likely to find a template that fits your exact needs.
Plus, online resume templates and resume builders often have more design elements that are easier to use compared to Microsoft Word.
Are you interested in using our online templates or resume builder? Check out our beautifully designed resume templates to build your optimal resume!
Microsoft Word offers a lot of capabilities to help you build your ideal resume.
Here are five key takeaways for creating a resume on the program:
At Easy Resume, we have designed our resume templates and online resume builder to fit your needs. No matter your level of experience or skill at making resumes, we have the tools to help.
Don’t forget to check out our expansive collection of FREE resume guides and examples while you’re here!